Full View Sight Flow Indicators
Application
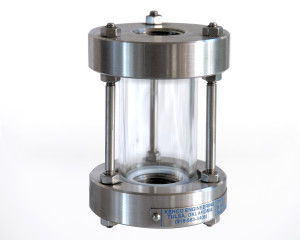
Full View Sight Flow Indicators are used to observe the flow of liquids in a piping system. 360° visibility provides convenient viewing from any angle. Designed for vertical applications. Threaded and flanged connections are available in a variety of sizes to match the diameter of the pipe being used. A wide range of end plate materials are available. Units can be made with any overall length if additional visibility is required. Full View Sight Flow Indicators are used in low pressure applications. Maximum pressure allowable will vary with temperature and size.
Specifications
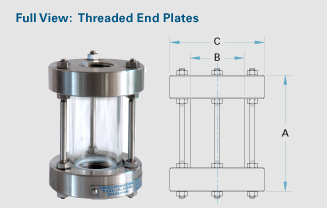
Full View: Threaded End Plates
| Size Inches |
Dimensions | Pressure Rating |
||
| *A | B (I.D.) | C | ||
| 0.50 | 4.50 | 1.44 | 3.50 | 150 psig (10.34 bar) |
| 0.75 | 4.50 | 1.44 | 3.50 | 150 psig (10.34 bar) |
| 1.00 | 4.50 | 1.63 | 3.50 | 150 psig (10.34 bar) |
| 1.25 | 4.75 | 2.13 | 4.00 | 150 psig (10.34 bar) |
| 1.50 | 4.75 | 2.13 | 4.00 | 120 psig (8.27 bar) |
| 2.00 | 5.50 | 2.63 | 4.50 | 100 psig (6.89 bar) |
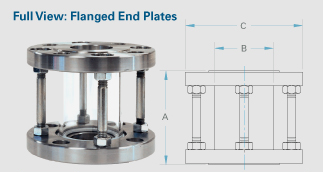
Full View: Flanged End Plates
| Size (Inches) |
Dimensions | Pressure Rating |
||
| A | B (I.D.) | C | ||
| 0.50 | 3.88 | 0.94 | 3.50 | 150 psig (10.34 bar) |
| 0.75 | 3.88 | 1.19 | 3.88 | 150 psig (10.34 bar) |
| 1.00 | 4.00 | 1.44 | 4.25 | 150 psig (10.34 bar) |
| 1.50 | 4.00 | 2.13 | 5.00 | 120 psig (8.27 bar) |
| 2.00 | 4.75 | 2.63 | 6.00 | 100 psig (6.89 bar) |
| 2.50 | 5.38 | 3.13 | 7.00 | 85 psig (5.86 bar) |
| 3.00 | 5.38 | 3.50 | 7.50 | 100 psig (6.89 bar) |
| 4.00 | 7.50 | 4.50 | 9.00 | 70 psig (4.82 bar) |
| 6.00 | 10.38 | 6.25 | 11.00 | 45 psig (3.10 bar) |
Connection Types
- F = Flanged
- T = Threaded
Standard Sizes for Flanged Models
- 0.50″
- 0.75″
- 1.00″
- 1.50″
- 2.00″
- 2.50″
- 3.00
- 4.00″
- 6.00″
Standard Sizes for Threaded Models
- 0.50″
- 0.75″
- 1.00″
- 1.25″
- 1.50″
- 2.00″
Seals
- B = Buna-N
- A = Aflas
- E = Ethylene Propylene
- N= Neoprene
- V = Fluorocarbon
- TN= PTFE Envelope with Neoprene Center
- TS = PTFE Envelope with Silicone Center
- TV= PTFE Envelope with Viton Center
* Other seal materials available. Consult factory for options.
End Plate Material
- A20= Alloy 20
- HC = Hastelloy C 276
- CS= Carbon Steel
- S4= 304 Stainless Steel
- S6= 316 Stainless Steel
- P= Polyvinyl Chloride (PVC)
- CP= Chlorinated Polyvinyl Chloride (CPVC)
* NOTE: Units can be supplied in any length required. Please specify overall length requirement in inches on end of model number if it deviates from the standard sizes indicated above.


